Tag Archives: water conservation

Rain barrel hook up

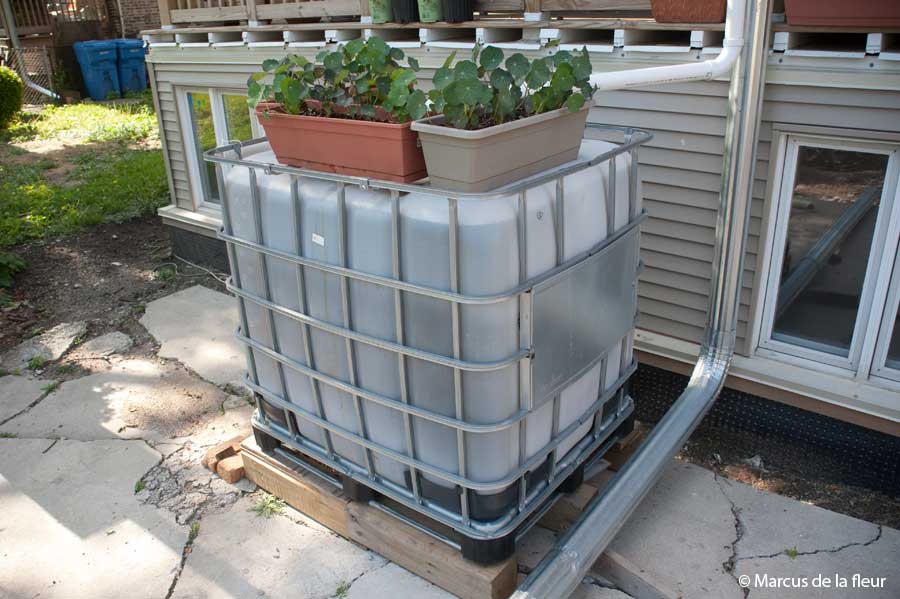
Well, it’s less of a rain barrel and more of a rain tote – a 250 gallon IBC tote! (IBC: intermediate bulk container). Considering that I have 1,500 square feet of contributing roof surface, I didn’t want to tinker around with 55 gallon rain barrel drums.

rain-barrels-15

An IBC tote comes with very convenient plumbing connections. For example, the screw lid on the top comes with a standard two inch threaded female connection. All I had to do is connect the supply pipe to it with a two inch male schedule 40 connector – and, done!

rain-barrels-16

The tote also comes with what you may call a faucet. A ball valve drain with a spout, and it is even located at the very bottom. Filling up a watering can from a regular faucet eats into your time. But this thing has a flow rate that fills a two gallon watering can in less than ten seconds. I love it.

rain-barrels-17 rain-barrels-18

The only thing that it didn’t have was a plumbing connection for an overflow. I solved that problem with a two inch bulkhead fitting. Because – remember – the supply pipe to a rain barrel should be the same size as the overflow. Two inch supply, two inch overflow.

rain-barrels-19

To fit the two inch bulkhead fitting, I had to drill a three inch hole into a piece of vertical and flat tank wall. That got me below the maximum fill line of the tank. But a couple of elbows got me back to that 250 gallon fill line.

rain-barrels-20

I also included a piece of mosquito screen across the overflow pipe. This way I keep the blood suckers from breeding in my barrel. On the supply side, the screen in the diverter-filter combo keeps the critters out.

Oh yes–and I had to connect the diverter to the rain barrel (or tote) with a couple of elbows and some two inch pipe.

rain-barrels-21

Now, where did I find this beauty – this IBC tote? Craigslist! It came from an industrial cookie bakery and had originally high fructose corn syrup in it. Cost: $75. Sweet, isn’t it?

Related posts:

Downspout diverter set up

Fitting my new, homemade diverter-filter combo into our downspout was my next task. Its was fairly straight forward stuff.

I cut out a piece from the existing downspout to fit in the diverter. The piece I removed was slightly shorter than the diverter is tall to assure it slides into the downspout.

rain-barrels-11

The diverter-filter combo is fairly heavy. I needed two sturdy angle brackets on the porch post that would hold the diverter. I also installed two saddles that would keep the diverter in position for a perfect connection to the downspouts.

Well, an almost perfect connection … My five inch downspout is still a little smaller than the six inch diverter. To overcome the one inch discrepancy, I flared the end of the downspout that connects to the top of the diverter.

rain-barrels-12 rain-barrels-13

Once the diverter was sitting on the brackets and pushed into the saddles, it fit like a glove. Last but not least, I strapped it to the porch post.

rain-barrels-14

What isn’t included in this set up is a winter bypass. At the beginning of December, I will have to disconnect and take down the diverter-filter combo and replace it with a piece of downspout for the duration of the freezing months. This way, I will bypass the rain barrel altogether for that time.

Oh, yes! There is a rain barrel involved, isn’t there?

Related posts:

About flow and filtering

It wasn’t pretty or long lasting, but our system in from the early days got the water from the downspout into the rain barrels and got it filtered along the way.

I am now looking for a more permanent and slightly more elegant solution. The plumbing part seems straightforward; the filtering, not so much.

As mentioned in the last post, it is not that difficult to find a number of downspout diverters that would get the rainwater into your rain barrels. The good ones come with a built in, self cleaning filter that keeps debris out of the barrels. The even better ones also come with a winter bypass option.

Yet, none of the diverter-filter combos for sale would fit our five inch, round downspout. And if you live in the City of Chicago, you may share my dilemma! It was time again for some DIY. I cobbled together a diverter-filter combo following the basic principles of the better products that are on the market.

rain-barrels-10

One thing to remember is that water likes to cling to the wall of your downspouts. That is where you find most of the flow. Once in the filter, it runs across an angled screen. Most debris should wash across the screen and continue down the downspout. Clean water, on the other hand, passes through the screen and is diverted into the rain barrel.

From concept to creation

I got myself some PVC pipe and fittings in the hope that the concept would translate into a functioning creation.

rain-barrels-05

Looking into the diverter from the top, the angled screen is visible. It starts at a six inch diameter and narrows down to a four inch diameter, where it is attached to the outflow pipe.

rain-barrels-06 rain-barrels-07

Looking into the diverter from the bottom, the four inch outflow pipe and the four to six inch reducer are visible. The outflow pipe extends beyond the reducer into the six inch diverter pipe. That is where the filtered water is collected.

rain-barrels-08

On the side, just atop the reducer, is a two inch pipe connection that leads to the rain barrels. It will convey all the water that passes through the screen and is collected between the four inch outflow and six inch diverter.

rain-barrels-09

And for those who are interested, here is my shopping list for the diverter-filter combo:

  • Six inch schedule 40 pvc pipe
  • Two six inch schedule 40 pvc couplings
  • One six-to-four inch schedule 40 pvc reducer
  • Four inch schedule 40 pvc pipe
  • Two inch schedule 40 pvc pipe plus fittings
  • Some pvc cement and some hardware
  • Stainless steel or aluminum screen
Related posts:

Floating ideas on rain barrels

I keep watering a lot because the lettuces growing in our back porch planters are thirsty. That is one of the drawbacks of planters. They don’t have much of a moisture reservoir and need water once, sometimes twice a day.

I was done schepping the watering cans out of the basement and decided that a new set of rain barrels would make my watering chores much easier. Plus they would convert a waste product (roof runoff) into a useful resource (water for irrigation).

Yet the how-to on rain barrels hasn’t quite trickled into our general knowledge base. I constantly run into this when speaking at conferences about rainwater harvesting options. Rain barrels seem so simple, yet it actually require some thought to get them right.

Raison d’être

Harvesting roof runoff and/or mitigating the impact of stormwater runoff is the primary function of rain barrels. That said, they can quickly become a white elephant, unless you plan to actively use them. In other words, you have a need for the harvested water, and/or it is likely that you draw the rain barrels empty on a frequent basis.

Some municipalities have rain barrel programs, which I mostly regard as well intended but not that helpful. The hope is that the rain barrels store some runoff and keep it out of the overtaxed stormwater system. Yet I noticed that most of those rain barrels, once installed, serve as mere decoration, and the stored water is not used or drained. The barrels sit there full with water for most of the warm season, which completely negates any intended runoff mitigation.

Proportionality

Say you have a good use for rain barrels or are willing to drain them between storms. What would be the contributing area (i.e. the size of the roof) that would feed into the rain barrels?

If you have a small bike shed with a couple of 55 gallon rain barrels connected to it, you may have to wait for quite a while before they fill up. Conversely, if you have a couple of rain barrels connected to a 2000 square foot roof, they may fill up in the blink of an eye.

rain-barrels-01

For rain barrels to provide any runoff mitigation benefits, their storage volume should be sized proportionally to the contributing roof area. For example, say they can store a quarter or half inch of rain fall on the contributing roof area. This may be more volume than you need for irrigation. In this case the barrels should be drained prior to approaching storms, to free up the storage volume.

Delivery

How do you get the water from the gutter and downspout into the rain barrels? These days you can find a variety of downspout diverters that solve that problem for you. The better ones have a built in filter that keeps debris out. The really fancy ones even have a winter bypass.

I used a homemade diverter and filter on our early rain barrels. It was not pretty, ideal or long lasting, but it did the job at the time.

Plumbing

Most rain barrel products come prepared with plumbing connections. But not all of them make sense. Here are some things to look out for:

If more than one barrel is needed, make sure they are connected to each other at the very bottom. You may have several barrels, but this way you have one storage volume. It allows you to access that entire storage volume from any barrel, and it will allow you to drain all barrels at once, which is important for winterizing.

rain-barrels-02

Go with a product that has the faucet to draw water from the barrel at the very bottom, not one third or half way up. If the faucet is not at the very bottom, you never can effectively use all of the stored water, or completely drain the barrels between storms or for winterizing purposes.

rain-barrels-03

Set the rain barrels on a pedestal. This would allow you to fit a watering can or bucket under the faucet, even if it is at the very bottom of the barrel.

Overflow

Well, this is really part of the plumbing, but it deserves a special mention.

Your rain barrel(s) will be full at some point. If it continues raining, you have to have a plan on how to deal with the overflow. A lot of people don’t and inadvertently create flooding issues where there previously were none.

For a starter, make sure the rain barrels have an overflow pipe somewhere at the top. That overflow pipe should be the same size as the supply pipe that is delivering water into the rain barrels. Under no circumstances should the overflow be smaller than the supply.

rain-barrels-04

Rain barrels are often placed right next to the house – next to a downspout. Have a plan on how to divert the overflow a safe distance away from the house and thus keep your basement foundation dry. A swale, a pipe extension or a channel could do that job.

Winterizing

If you are in a freezing climate, you need to winterize your rain barrels. That means they need to be completely drained during the freezing months. In addition, you have to disconnect the downspout diverter so no water is fed into the rain barrel(s). If you have a fancy diverter, you will need to put it into winter bypass mode, which should keep runoff out of your barrels.

If you fail do any of the above, or miss one of those steps, you are likely to become a proud owner of a giant ice cube … an ice cube that will make your barrels burst or crack.

Relates posts:
Plumbing – water conservation

It’s time to switch gears from the DWV system to fresh water plumbing.

I didn’t expect that there was much to the plumbing system. A cold water and hot water line to every fixture. Done.

Well, I was encouraged to reconsider while preparing for a presentation at Greenbuild 2010 here in Chicago. My co-presenter, Gary Klein, covered the subject of efficient plumbing systems. He lives and breathes high performance hot water systems and is delightfully obsessed with their efficiencies.

We began talking – about three weeks before the basement plumbing installation. And boy am I glad that we got to talking! Here is what I took home.

The objective…

… of the fresh water plumbing system should be resource conservation.These are the three key points of resource conservation:

  1. Water conservation
  2. Material conservation
  3. Energy conservation

Let’s take a look at each item, starting with…

… Water conservation

To reduce the overall consumption of water throughout the house, we had planned on a variety of low flow fixtures. The use of low flow fixtures was by choice, but was also mandated through a plumbing code variance as I had mentioned in a past post.

Here again is a summary of our targeted low flow rates for all fixtures:

  • Toilet 1.28/0.8 gpf
  • Bathroom faucet 0.5 gpm
  • Shower 1.5 gpm
  • Kitchen 1.5 gpm

Water Sense

A helpful guide in water conservation is the US EPA Water Sense program. It establishes minimum performance requirements (i.e. reduced water usage) for toilets, showerheads and faucets amongst other fixtures. The Water Sense web site has a product search function that will list qualified products and their low flow rates.

You may have seen the Water Sense labels on toilets or faucets in your plumbing supply store. It is now relatively easy to find fixtures that actually exceed the Water Sense requirements.

Not part of the Water Sense program are laundry machines and dish washers, although they are big water consumers. Both appliances are, however, part of the Energy Star program. Still, it is worthwhile to look out for their water consumption.

Washing machines

Front loading washing machines can clean more clothes with less water by design. Whereas top loading washers need to fill with water until all clothes are submerged, front loading, or H-axis washers rotate the clothes through water in the lower portion of the drum, thus cleaning more with less.

The average water consumption for washing machine in the U.S. is 41 gallons per load. High efficiency machines use as little at 28 gallons per load. That is still a lot of water, though.

We decided for an Energy Star rated front loading washer, which according to the Energy Star specifications uses only 11.4 gallons per washing cycle and has a water factor of 3.3.

Dishwasher

We haven’t purchased a dishwasher yet and  are still cleaning the dishes by hand. This, ironically, leads to more water consumption than with a dishwasher, according to Energy Star data. The listed savings though only apply to Energy Star qualified dishwashers.

Some of those use less than 2 gallons of water per cycle, which can add up to quite some water savings, considering that conventional or older dishwashers use over 6 gallons per cycle. Our target is to find used dishwashers with a water consumption of 2.5 to 5.5 gallons/cycle.

Greywater

Last but not least, the recycling of greywater, which I covered in a recent post, is another water conservation strategy.