Tag Archives: masonry

Attic masonry repair

There is a laundry list of masonry repair items on the 2nd floor waiting for me. Not just the masonry pockets from the ceiling joists, but re-pointing and brick replacement too.

As with the basement and 1st floor, we will install a layer of polyurethane spray foam (SPF) across the interior masonry walls. The SPF will help with the insulation and air sealing of the building envelope. Before we install the spray foam, I need to get those masonry repair items done. Once the SPF is installed, I won’t have access to the brick any longer.

Damage to the masonry wall is almost always moisture related. A quick inventory showed that most of the damage was confined to the attic area. This included efflorescence and crumbling mortar joints.

attic-04

This damage had been caused by water infiltrating into the masonry wall through the parapet, until we fixed it back in the fall of 2009.

I ground out the damaged mortar joints for re-pointing and removed all bricks that showed some level of spauling. Most of those bricks were along the north wall – the front of the building.

attic-07 attic-08

I suspect that I still have some water infiltration into the masonry along the north wall, right behind the cornice, where I can’t see it.

cornice-01

Fixing that problem will be a very interesting task, and probably requires me to take off the cornice and reinstall it.

For now, I had our mason come in to repoint the mortar joints and install the replacement .

attic-09

That took care of the masonry work. Well – almost…
Related posts:

Turning the table…

… on you. Yep, you – reading these lines!

Rather than documenting our thought processes, decisions and installation efforts, this time I need to solicit ideas from you to inform our next task at hand:

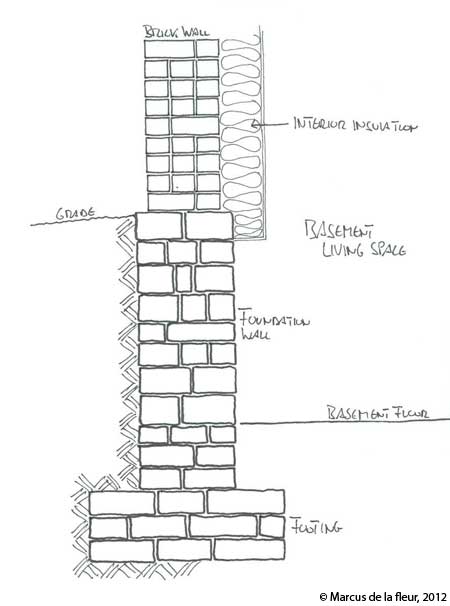
I would like to get the limestone foundation wall insulated from the outside. The foundation wall is all below grade except the top four inches, which stick out above grade. There are a number of different steps involved:

  1. Excavate around the foundation wall down to the footing
  2. Re-point the exposed foundation wall
  3. Install a foundation drain around the entire footing
  4. Install the insulation up against the foundation wall (four inches of XPS rigid foam insulation sheets)
  5. Install water proofing
  6. Install flashing at top of the insulation assembly
  7. Back fill and clean up

It is step #6 in this process I need help with. I can’t figure out how best to go about the flashing.

Here are two sketches: 1) The foundation wall as is, and 2) the foundation wall with the insulation assembly. (Click on the images for a larger view)


The red line in the second image represents the flashing component I need. It prevents any water from entering into the insulation assembly and thus keeps the foundation wall dry. The flashing will need a water tight connection to the brick wall and needs to extend over the water proofing component.

What would be a suitable material or product to use? Ideally I am looking for a prefabricated product that I can buy off the shelf. If not, I am open to fabricating something.

I can’t wait to hear your suggestions!

Masonry and windows – Part 3

Our masonry fixes around the 1st floor windows concluded with the west facing kitchen window.

So far, the repairs focused on the window guards and other exterior fixes. To get to the bottom of this window, we’ll need to look at the inside, at the kitchen layout.

The window in question is marked in red. Our kitchen counters run along the north and west wall, with a corner sink next to the kitchen window. Unfortunately the window dimensions—or to be more precise, the window height—does not agree with our kitchen counter plans.

The bottom section of the window would be hidden behind the counter. We decided that this is not a good idea. As it is with kitchens, debris from food preparations would end up in this hidden space and we would constantly have to clean it out.

Instead we opted to make the window shorter by bringing the sill above the kitchen counter elevation. And this is where Antonio, our mason, got back to work.

As before, he removed the window guards and did the necessary brick repair work. But he also filled the bottom of the window with brick and raised the limestone sill, while I adjusted the existing window buck to the new dimensions.

We feel that the new and shorter window is a much more elegant solution and avoids the creation of a garbage trap behind the kitchen counter.

Masonry and windows – Part 2

There is one bedroom window one the 1st floor that was added sometime later. That work was done rather poorly. So poorly, in fact, that we knew we had to redo the masonry work.

I took care of the interior brick repairs almost two years ago. The outside did not look any better, and it has been on my to-do list for a while.

If you take a close look, you can see where the original masonry wall meets the more recent work of the added window. The brickwork for the new window was never properly woven and anchored into the original masonry. What aggravated the situation further is that cement based mortar was used for this work instead of lime based mortar.

Over the years, the more recent brick work slowly but steadily began to separate for the original masonry, forming small cracks through which water could enter, which further accelerated the decline of the masonry. In short, the brick work around the added window was in an accelerating tail spin.

Well, I guess you can say that I had a pretty good incentive to get this fixed.

While our mason removed all the old window guards, I also asked him to fix the masonry around this window.

Once the window guard was taken out, we removed the deteriorating brick, but also cut pieces out of the original masonry. This gave us a weave pattern that allowed us to properly anchor the repair work with the original masonry wall.

We were careful to make sure we used the proper lime based mortar. This should now last a long time, even longer than we could live in this building.

Masonry and windows – Part 1

The season and the approaching cold weather begin to dictate the various tasks at hand. One of them is the masonry repair work around the 1st floor windows.

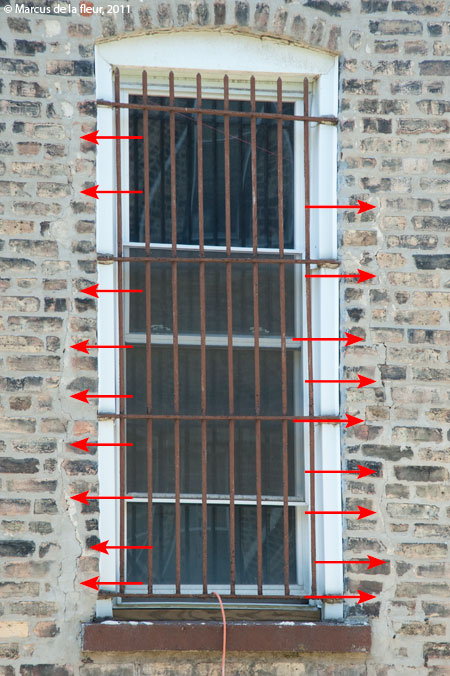
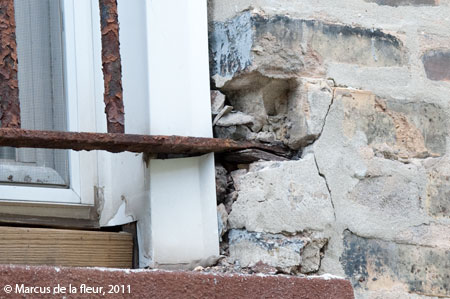
Almost all the 1st floor windows have window guards. These have been sitting there for a long time with no maintenance and have slowly begun to corrode.

That includes the anchors that are let into the first wythe of the masonry wall. When metal starts to corrode, it begins to expand with an amazing force, pushing some of the surrounding brick work out.

We decided to remove the guards and restore them like we did with the basement windows.

To save time, I called in our mason, who was happy to stop by and take care of the repairs.

He cut and removed the damage brick, removed the guards, which I stowed away in the basement for the time being, and patched the holes with salvaged common brick. As with all masonry work on our old building, I was careful to make sure that we use the right lime based mortar.

This took care of most of the windows, except two, which are a little more involved. More on those in the next posts.